Guide
How to Clean an Air Fryer Properly (Step-by-Step)
By Sarah Kim · Updated 2026-03-23
Disclosure: Air Fryer Zone may earn commissions from qualifying purchases. This does not influence our recommendations.
By Sarah Kim · Last updated March 2026
To clean an air fryer properly: remove the basket and drawer, soak in hot soapy water for 10–15 minutes, scrub with a soft sponge, wipe the interior walls with a damp cloth, use a soft brush on the heating element (unplugged), wipe the exterior, and dry all parts completely before reassembling. This full clean takes 15–20 minutes and should happen after every 3–5 uses. The basket itself needs a quick wash after every single use.
Regular cleaning extends air fryer life significantly — a dirty heating element reduces efficiency and creates smoke.
What You Need
Before starting, gather:
| Item | Purpose |
|---|---|
| Mild dish soap | Grease and food residue removal |
| Soft sponge or cloth | Non-scratch surface cleaning |
| Soft-bristle brush (old toothbrush) | Crevices, basket mesh, heating element |
| Baking soda | Paste for stubborn baked-on residue |
| White vinegar | Odor neutralization, light degreasing |
| Microfiber cloth | Streak-free exterior cleaning |
| Paper towels | Absorbing oil, drying surfaces |
Do NOT use:
- Steel wool or abrasive scrubbing pads (scratches non-stick)
- Bleach-based cleaners (damages coating)
- Spray cleaners directly on interior (liquid reaches heating element)
- Harsh chemical degreasers (degrades non-stick faster)
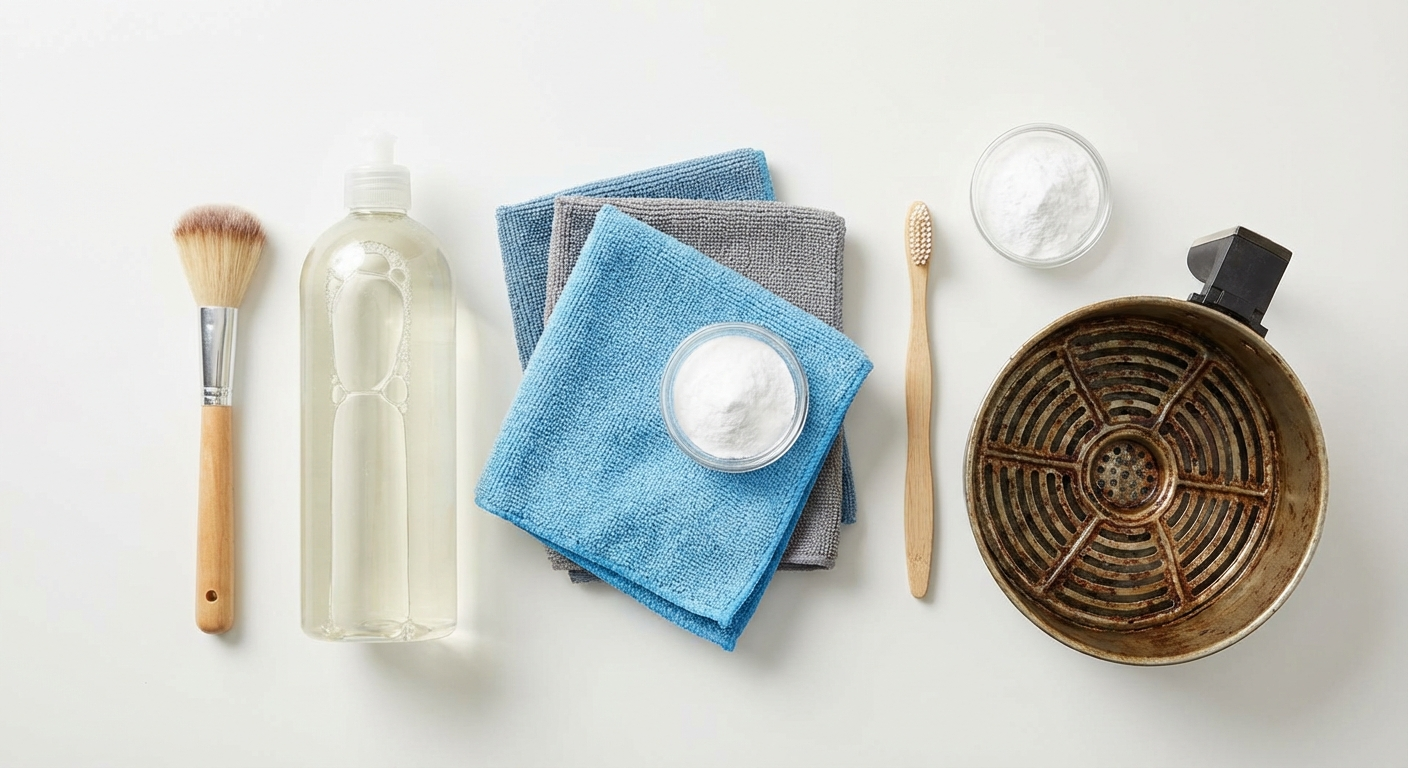 Keep these supplies within reach before you start — having everything ready makes the process faster.
Step 1: Safety First — Unplug and Cool Down
Always unplug the air fryer before cleaning. This is not optional — it prevents:
- Electrical shock from water contact with the heating element
- Burns from hot surfaces
- Accidental activation during cleaning
Wait for complete cooling: Air fryers reach 300–400°F during operation. Allow at least 30 minutes after the last use before handling internal components. The exterior should be cool to the touch before proceeding.
If you've been cooking at high temperatures — such as chicken thighs at 400°F — the basket retains heat longer. Give it a full 40 minutes before cleaning. You can speed cooling slightly by pulling the basket and drawer out and setting them on a heat-safe surface to allow air circulation on all sides.
Quick test: Touch the outside of the basket gently with the back of your hand. If it's warm at all, wait longer. Internal surfaces are hotter than what you feel on the outside.
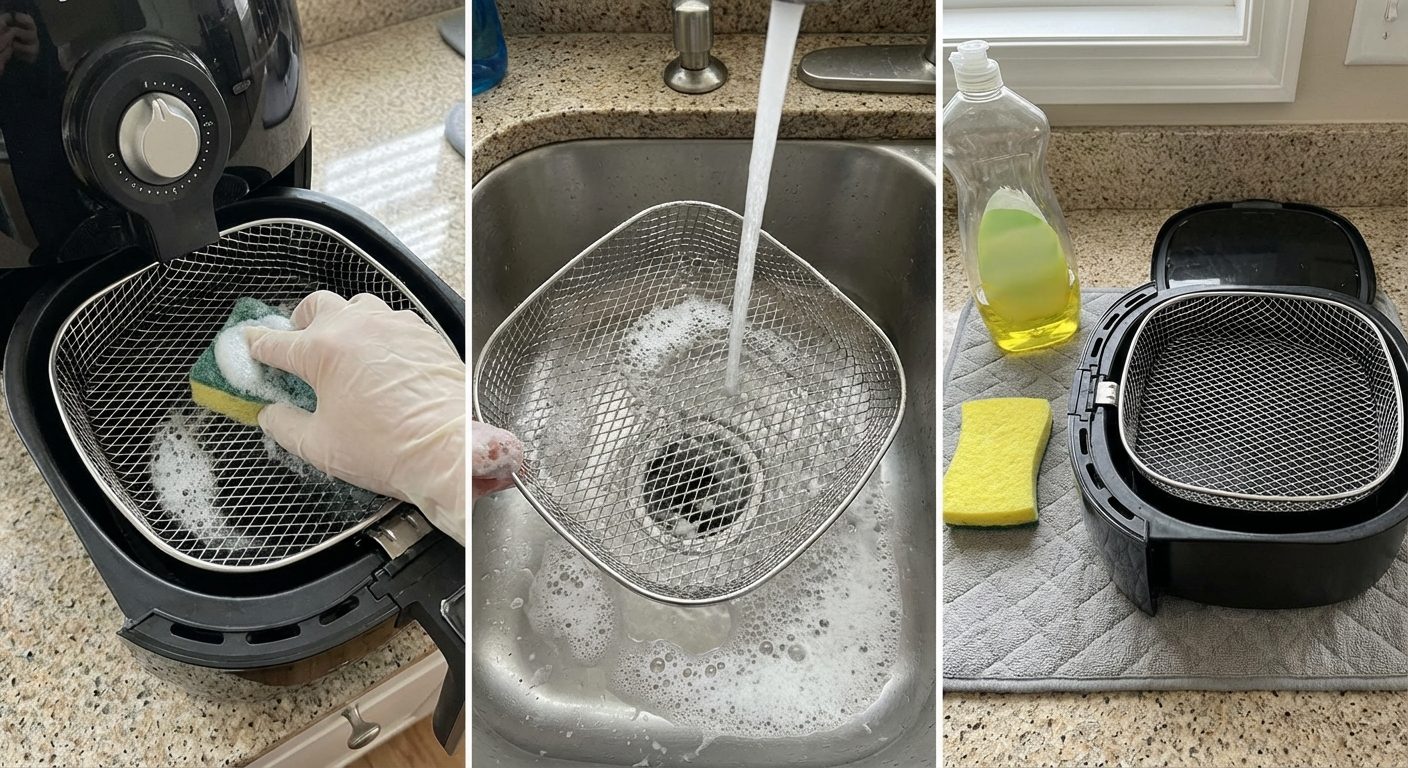
Step 2: Remove and Clean the Basket
The basket is the dirtiest part and needs attention after every use.
 Soaking the basket for 10-15 minutes loosens baked-on food and grease without requiring harsh scrubbing.
Quick Post-Cook Clean (After Every Use)
- Remove the basket from the air fryer
- Allow to cool if hot
- Rinse under hot water to remove loose food debris
- Add a drop of dish soap and scrub with a soft sponge
- Rinse thoroughly
- Dry with a cloth or leave to air dry completely
This quick rinse after each cook prevents the kind of carbonized buildup that becomes genuinely difficult to remove later. Even if the basket looks clean, oils from cooking coat the mesh holes and harden during the next preheat — creating a sticky, discolored layer over time.
Full Basket Clean (Every 3-5 Uses)
- Fill the sink with hot water and a generous squirt of dish soap
- Submerge the basket completely and soak for 10-15 minutes
- Scrub with a soft sponge on flat surfaces
- Use a soft-bristle brush (old toothbrush) on the mesh and crevices
- Pay special attention to the basket holes where grease accumulates
- Rinse under hot running water, checking mesh holes are clear
- Shake off excess water and leave to dry completely
Dishwasher: Most baskets are technically dishwasher-safe, but regular dishwasher use degrades non-stick coating faster than hand washing. Dishwasher detergent is significantly more alkaline than hand soap, and the sustained high temperatures in the drying cycle accelerate coating breakdown. Hand wash when possible — it adds 3 minutes but extends basket life by months.
Checking Basket Condition
While cleaning, inspect the basket surface. If you see flaking, peeling, or discolored spots where the coating has worn through to bare metal, it's time to replace the basket. Cooking with a damaged non-stick surface means food particles get trapped in the rough spots, creating a cycle of burning and sticking that no amount of cleaning can fix.
Step 3: Clean the Drawer and Outer Basket
The drawer (the pull-out compartment that holds the basket) collects grease drippings and is often overlooked.
 Pour accumulated grease onto paper towels for disposal — never down the drain, where it solidifies and causes clogs.
- Remove the drawer from the air fryer unit
- Pour out any accumulated grease or liquid (pour into paper towel, not sink — grease clogs drains)
- Soak in hot soapy water for 5-10 minutes if greasy
- Wipe with a soft cloth or sponge
- Rinse and dry completely
Important: The bottom of the drawer often has baked-on dark residue. This happens because grease drips from the basket during cooking and then bakes onto the drawer surface during the next preheat. Soak and use a baking soda paste for this area (see stubborn grease section below).
The release mechanism: Most drawer-style air fryers have a release button where the basket sits inside the drawer. Food particles and grease accumulate in this mechanism. Use a toothbrush dipped in soapy water to clean around the release button and the rim where the basket rests — this prevents the basket from sticking and ensures a clean seal during cooking.
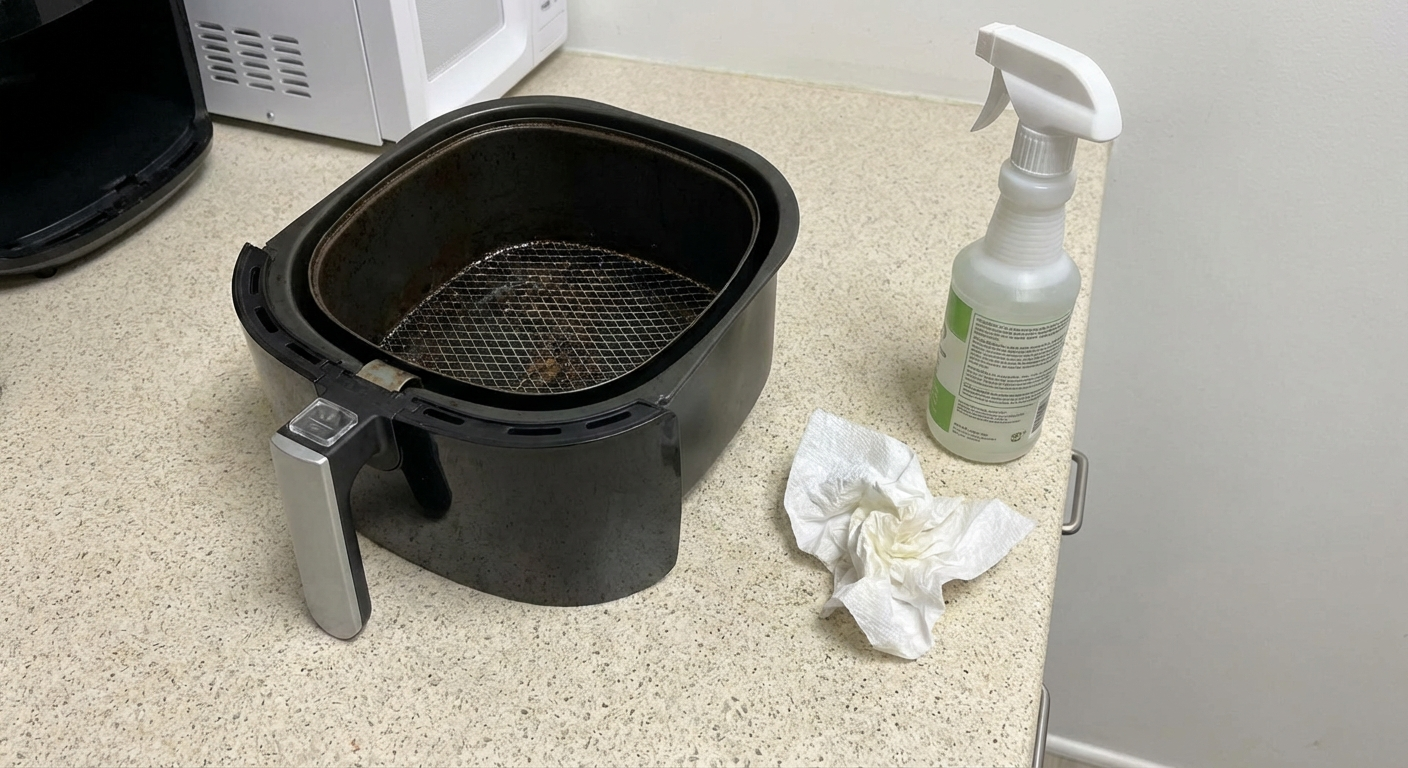
Step 4: Clean the Interior Walls
The interior walls accumulate grease splatter and smoke residue over time.
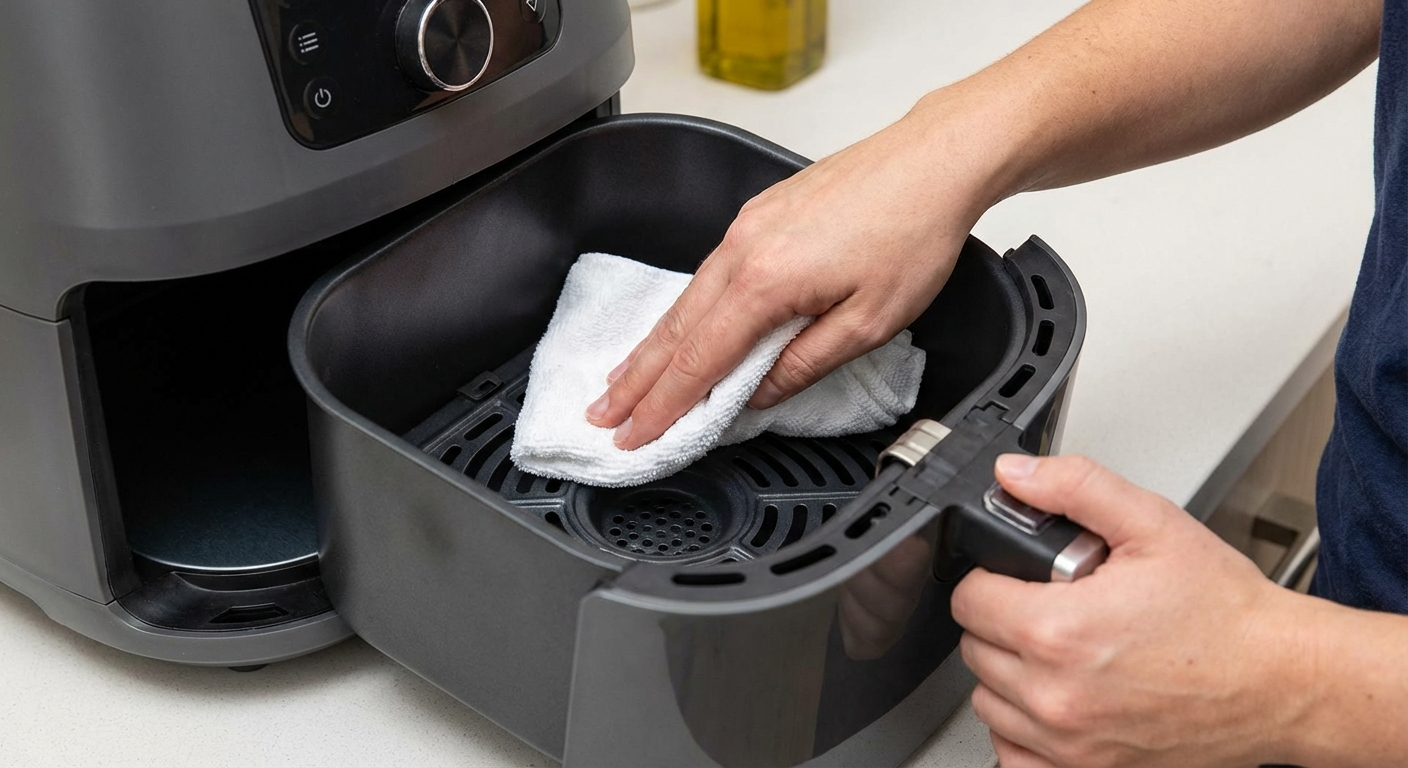 Interior cleaning: wipe with a damp cloth after removing the basket — prevents grease buildup that causes smoke.
- Use a damp cloth or paper towel moistened with dish soap solution
- Wipe the interior walls, ceiling (the cooking chamber above the basket), and bottom surface
- For grease buildup: make a paste of baking soda and water (2:1 ratio), apply to affected areas, wait 10 minutes, then wipe off
- Wipe again with a clean damp cloth to remove soap residue
- Allow to dry completely with the drawer open
Never spray liquid directly into the interior — it can seep into the heating element housing and cause electrical issues.
The ceiling is the worst spot. Grease splatters upward during cooking and hits the ceiling of the chamber, where it bakes on session after session. Many people focus on the basket and forget the ceiling entirely. Wipe it every time you do a full interior clean. If you neglect it long enough, the buildup carbonizes into a hard shell that produces smoke and off-flavors in your food.
Understanding how your air fryer circulates air helps explain where grease builds up. If you're unsure how the airflow differs between appliance types, our air fryer vs. convection oven comparison breaks down the internal mechanics.
Step 5: Clean the Heating Element
The heating element is the most important and most neglected part of air fryer cleaning. Grease buildup on the heating element causes:
- Smoke during operation
- Burning smells
- Reduced cooking efficiency
- Fire risk in severe buildup cases
How to Clean the Heating Element
- Ensure the unit is completely unplugged and cool
- Turn the air fryer upside down over a table or counter
- Look at the heating coil — it should be visible through the top interior
- Use a soft brush (soft toothbrush) to gently brush away any food debris or grease
- For stubborn deposits: dampen the brush slightly with diluted dish soap (not soaking wet) and brush gently
- Wipe with a slightly damp cloth — not saturated
- Leave the unit upside down for 15-30 minutes to allow any moisture to evaporate
- Do not run the air fryer until completely dry
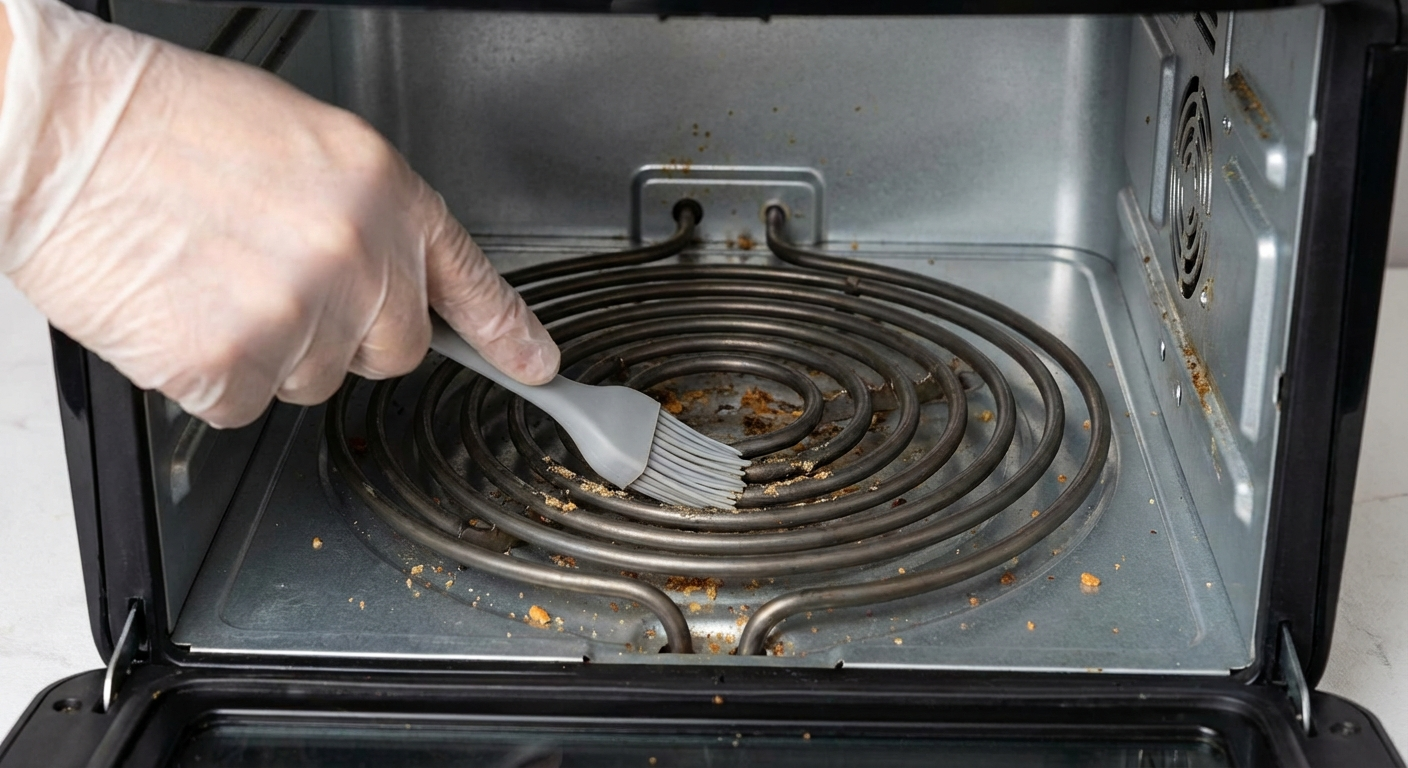 Use a dry, soft-bristle brush first to remove loose debris from the heating coil — only dampen if deposits won't brush away.
Frequency: Inspect every 5-10 uses. Full heating element clean monthly or whenever you see smoke.
Signs Your Heating Element Needs Immediate Cleaning
- White smoke on startup before food is added — this is grease burning off the element
- Acrid or chemical smell distinct from food cooking — carbonized grease produces this
- Visible dark buildup on the coil when you look inside the top of the unit
- Uneven cooking — buildup on one section of the element creates hot spots and cold spots
A clean heating element is also critical for accurate temperature performance. If you've noticed your air fryer cooking unevenly or running hotter than expected, check our air fryer temperature guide — but clean the element first, as buildup is the most common cause of temperature inconsistency.
Step 6: Clean the Exterior
The exterior of the air fryer collects kitchen grease, fingerprints, and splatter.
- Wipe with a damp microfiber cloth
- For stainless steel exteriors: use a stainless steel cleaner or diluted white vinegar, wipe in the direction of the grain
- For plastic exteriors: mild dish soap on a damp cloth
- Dry with a clean cloth to prevent water spots
- Clean the buttons and display with a lightly damp cloth (not wet) — water can damage electronic controls
The air vents: Use a soft brush or compressed air to remove dust from the ventilation slots on the back/bottom of the unit. Blocked vents reduce airflow and can overheat the unit. Check vents monthly — kitchen grease and dust combine into a sticky film that restricts airflow gradually enough that you won't notice until performance drops.
The power cord: Wipe the power cord with a damp cloth periodically. Grease migrates along the cord and makes it slippery. While cleaning, inspect the cord for any damage — frayed cords are a fire hazard and mean the unit should be replaced.
Step 7: Dry and Reassemble
Completely dry all parts before reassembling.
Why drying matters:
- Moisture on the heating element causes steam and electrical issues during first use
- Water trapped in basket mesh causes rust over time on lower-quality baskets
- Residual water on the non-stick coating creates steam spots during cooking
- Use a dry cloth or paper towel on all surfaces
- Leave basket and drawer out in the open air for 15-30 minutes before reassembly
- Check the basket holes are clear of water
- Reassemble only when all parts feel dry to the touch
Storage tip: Once clean and dry, leave the drawer slightly open rather than pushed fully closed. This allows air circulation inside the unit and prevents any residual moisture from creating a musty smell. If you store the air fryer in a cabinet, this also prevents the sealed interior from developing odors between uses.
How Often to Clean Each Part
| Component | Frequency | Time Required |
|---|---|---|
| Basket | After every use (quick wash) | 3-5 minutes |
| Basket | Full soak clean | Every 3-5 uses, 10-15 minutes |
| Drawer | After every use (wipe) | 2 minutes |
| Interior walls | Every 3-5 uses | 5-10 minutes |
| Heating element | Every 10 uses or when smoking | 5-10 minutes |
| Exterior | Weekly | 3-5 minutes |
| Air vents | Monthly | 2-3 minutes |
| Full deep clean | Monthly | 30-45 minutes |
Adjust based on what you cook. High-fat foods (chicken wings, bacon, sausages) produce significantly more grease than vegetables or frozen snacks. If you cook fatty proteins several times a week, shift the full clean schedule to every 2-3 uses instead of 3-5. Conversely, if you primarily reheat leftovers or cook vegetables, you can stretch to every 5-7 uses for the interior and drawer.
How to Remove Stubborn Baked-On Grease
 Baking soda paste is the safest effective method for removing baked-on grease without scratching non-stick coating.
Baking Soda Paste Method
Most effective for stubborn basket residue, drawer bottom, and interior walls.
- Mix 2 tablespoons of baking soda with 1 tablespoon of water to create a thick paste
- Apply paste to the affected area
- Let sit for 10-15 minutes (the alkalinity breaks down the grease)
- Scrub with a soft sponge or brush
- Rinse thoroughly with warm water
For severely baked-on spots that have been through dozens of cook cycles, extend the soak to 30 minutes. You can also add a few drops of dish soap to the paste for extra degreasing power. The paste should be thick enough to cling vertically — if it runs off, add more baking soda.
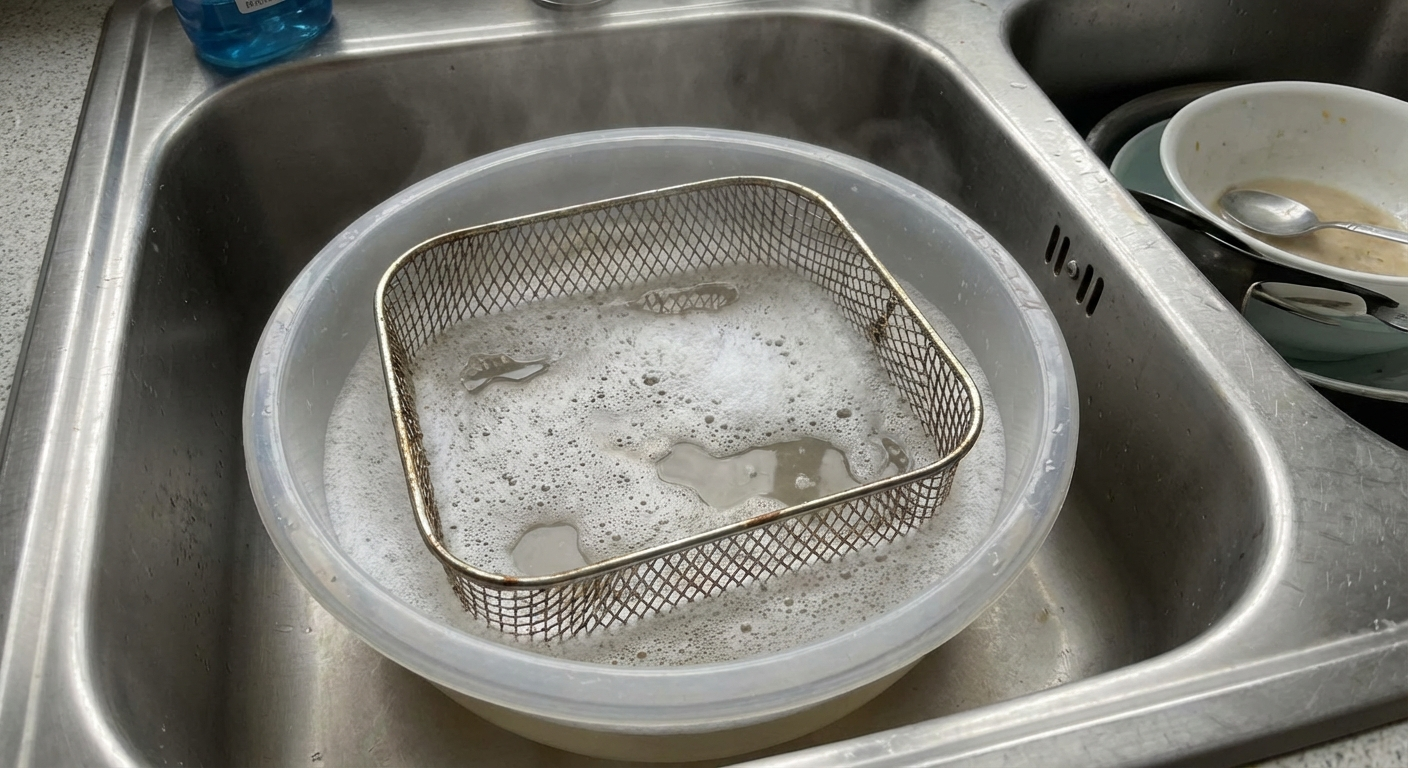
Dish Soap Soak Method
Most effective for greasy drawer and basket after cooking fatty meats.
- Fill the basket/drawer with hot water and several drops of dish soap
- Let soak for 20-30 minutes
- The grease will loosen and wipe away easily
- Scrub any remaining spots and rinse
Hot water matters here. Cold water doesn't cut grease — the water needs to be hot enough that it's uncomfortable (not scalding) to touch. Dish soap works by emulsifying fats, and warm temperatures significantly increase its effectiveness.
White Vinegar Method
Most effective for odors, calcium deposits (hard water stains), and light grease.
- Mix equal parts white vinegar and water
- Wipe the affected surfaces
- Let sit for 5 minutes
- Wipe clean with a damp cloth
- Dry thoroughly
Boiling Water Steam Method
Most effective for loosening widespread interior buildup without scrubbing.
- Place a small oven-safe bowl of water inside the basket
- Run the air fryer at 350°F for 3-5 minutes (this creates steam)
- Turn off and unplug the unit
- Wait 5 minutes for the steam to soften grease on the walls and ceiling
- Wipe all interior surfaces with a cloth — the loosened grease comes off easily
This method is particularly useful for the ceiling area, which is difficult to scrub directly. The steam reaches every surface and does the loosening work for you.
How to Eliminate Air Fryer Odors
Persistent odors are one of the most common air fryer complaints, and they almost always trace back to a cleaning issue.
Identifying the Odor Source
- Burning/acrid smell: Grease on the heating element — clean the element
- Stale food smell: Residue in basket mesh holes or drawer crevices — deep soak and brush
- Plastic or chemical smell (new units): Manufacturing residue — run empty at 400°F for 15 minutes, then wipe and repeat
- Fishy or strong food smell: Oil has polymerized (turned into a hard film) on interior surfaces — baking soda paste treatment
Odor Removal Methods
Lemon juice method: Cut a lemon in half, place both halves in the basket, run at 370°F for 3 minutes. The citric acid vapor neutralizes odors and leaves a clean scent.
Vinegar wipe-down: After cleaning all surfaces, wipe the interior with a cloth dampened in undiluted white vinegar. Let air dry with the drawer open. Vinegar neutralizes most organic odors.
Activated charcoal overnight: Place a small bowl of activated charcoal inside the closed (unplugged) air fryer overnight. Charcoal absorbs odor molecules from the enclosed space. This works well for persistent smells that survive regular cleaning.
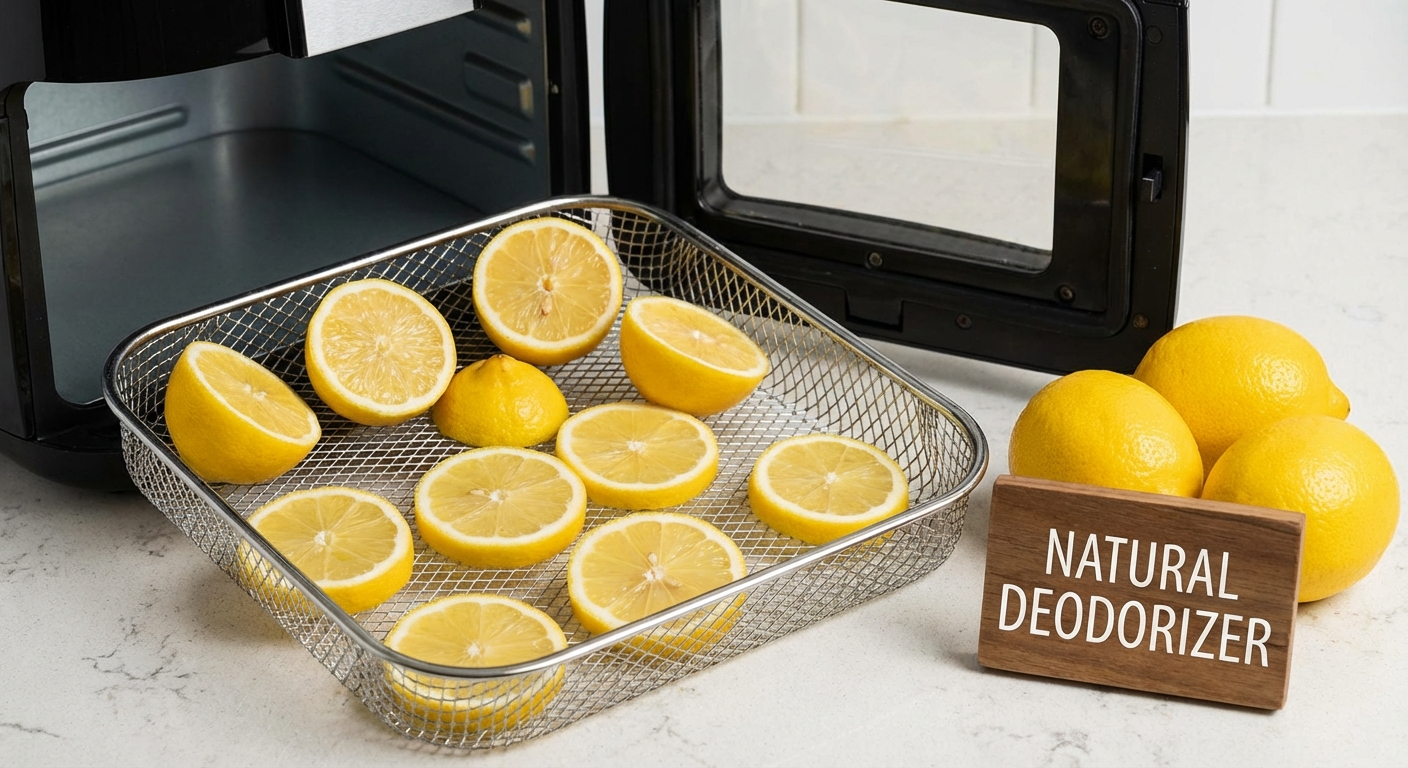 Running lemon halves in the air fryer at 370°F for 3 minutes is a quick fix for lingering food odors.
Common Cleaning Mistakes to Avoid
| Mistake | Why It's Damaging | What to Do Instead |
|---|---|---|
| Using steel wool | Permanently scratches and destroys non-stick coating | Soft sponge or cloth only |
| Putting the main unit in water | Destroys electronics and heating element | Clean exterior and interior by wiping only |
| Using bleach cleaners | Damages non-stick coating, releases fumes | Mild dish soap or baking soda |
| Cleaning while still hot | Burns risk, thermal shock to coating | Wait 30 minutes to cool completely |
| Leaving wet parts to reassemble | Rust on cheaper baskets; steam issues on first use | Dry completely before reassembly |
| Spraying liquid into the interior | Liquid reaches heating element | Apply cleaner to cloth first, then wipe |
| Stacking basket in sink with other dishes | Metal contact scratches non-stick | Place separately or use a basin |
| Skipping the ceiling/top interior | Grease buildup causes smoke and off-flavors | Wipe the ceiling every full clean |
| Ignoring the air vents | Restricted airflow leads to overheating | Brush or blow out vents monthly |
Air Fryer Cleaning Products: What to Use and Avoid
Soft Silicone Brush Set
Reaches basket mesh holes and crevices without scratching non-stick coating. Heat-resistant bristles won't melt if the basket is still slightly warm.
View on AmazonNon-Scratch Sponges (Multi-Pack)
Soft side for non-stick surfaces — no abrasive green layer that damages coating. Dedicate one to air fryer use only to avoid cross-contamination with dish residue.
View on AmazonPerforated Air Fryer Liners
Perforated parchment liners reduce basket cleanup significantly — use for messy foods like breaded items, cheese-topped dishes, or marinated proteins.
View on AmazonMicrofiber Cleaning Cloths
Lint-free and ultra-soft for wiping interior walls and stainless steel exteriors without scratching. Machine washable for hundreds of uses.
View on AmazonSilicone Air Fryer Mats
Reusable silicone mats with raised edges keep grease from contacting the basket directly. Dishwasher-safe and heat-resistant to 450°F — a one-time purchase that reduces cleanup permanently.
View on AmazonCompressed Air Duster
Blasts dust and debris from air vents, heating element crevices, and the gap between buttons. Keeps airflow unrestricted without disassembly.
View on AmazonFor air fryer meal planning that reduces cleanup, see our guide on batch cooking for families at planfamilymeals.com — planning meals that work well in air fryers reduces the need for intensive cleaning between cooks.
Cleaning Tips by Air Fryer Type
Not all air fryers clean the same way. The type you own determines which parts need the most attention and how accessible they are.
Basket-Style Air Fryers
The most common type. The steps in this guide are written primarily for basket-style units (Cosori, Ninja, Instant Vortex). The basket pulls out like a drawer and sits inside a larger outer basket or tray. Key cleaning considerations:
- Two-piece basket systems (basket + outer tray): Clean both pieces separately. Grease pools in the outer tray and bakes on quickly.
- Single-basket designs: Simpler to clean but grease drips directly into the drawer below.
Air Fryer Ovens / Toaster Oven Style
Air fryer ovens like the Breville Smart Oven Air and Cuisinart TOA series have a different layout — a door that opens in front, wire racks, and a drip tray at the bottom. If you're deciding between appliance types, our air fryer oven vs. regular oven comparison explains the differences.
Cleaning differences for oven-style units:
- Wire racks: Soak in soapy water like the basket. Use a brush to clean between the wires.
- Drip tray: This catches all the grease and needs cleaning after every use. Line it with foil for easier cleanup.
- Interior walls: Larger surface area means more wiping. The door glass also needs cleaning — grease splatters on the inside of the glass and bakes on.
- Heating elements (top and bottom): Oven-style units often have two elements. Both need inspection and cleaning.
- Crumb tray: Slide out and empty after every use. Crumbs left in the tray carbonize and smoke.
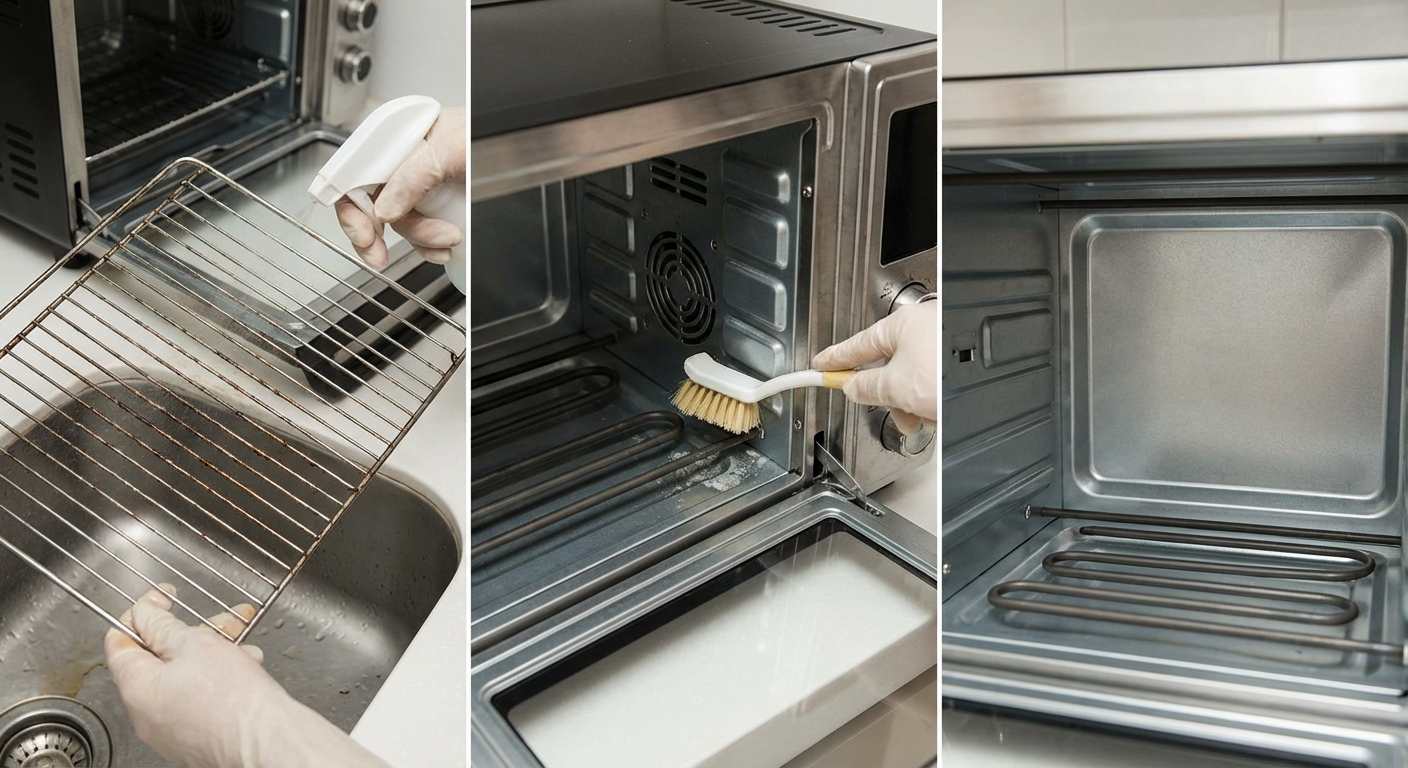 Oven-style air fryers have more surfaces to clean — wire racks, drip trays, glass doors, and dual heating elements all need regular attention.
Dual-Basket Air Fryers
Models like the Ninja Foodi DualZone have two independent baskets. Double the baskets means double the cleaning — but the advantage is that each basket is smaller and faster to wash. Clean both baskets and both drawers after every use, even if you only used one side. Grease vapor from one side can coat surfaces in the other.
Frequently Asked Questions
How often should I clean my air fryer?
Quick basket wash after every use (3-5 min). Full interior clean every 3-5 uses (15-20 min). Heating element inspection monthly. Full deep clean monthly (30-45 min).
Can I put my air fryer basket in the dishwasher?
Most baskets are dishwasher-safe but hand washing extends non-stick life. Dishwasher detergent and heat accelerate non-stick degradation over time.
How do I remove baked-on grease?
Soak in hot soapy water for 20-30 minutes. For stubborn residue, apply baking soda paste, wait 10 minutes, then scrub with a soft brush.
How do I clean the heating element?
Unplug, cool completely, turn upside down, brush gently with soft brush, wipe with slightly damp cloth. Never saturate with water.
Why does my air fryer smell bad?
Grease buildup on heating element is the primary cause. Clean thoroughly, then run empty at 370°F for 3 minutes with a few drops of lemon juice to neutralize odors.
Can I use aluminum foil when cleaning an air fryer?
No — foil scratches non-stick surfaces. Foil is useful during cooking to catch drips and reduce cleanup, but never use it as a cleaning tool. Use soft cloths, sponges, or soft-bristle brushes only.
What cleaning products are safe?
Safe: mild dish soap, baking soda, diluted vinegar, soft cloths. Avoid: bleach, abrasives, steel wool, spray cleaners applied directly to interior.
Sources and Methodology
References:
- USDA Food Safety: cooking equipment cleaning guidelines
- NSF International: home appliance sanitation standards
- Air fryer manufacturer cleaning guides (Cosori, Ninja, Instant, Philips)
- Cooke B. "Air Fryer Cooking for Beginners." Rockridge Press, 2019.
By Sarah Kim, Air Fryer Cooking Expert
Sarah Kim has tested over 50 air fryer models and developed hundreds of air fryer recipes. This site may earn commissions from qualifying purchases. Last updated March 2026.